Abstract
This report details the development of my project to build a continuous delivery toolchain which allows for developers to publish their code to a GitHub repository. From there, an end user will be able to see that there is an update available and, when they connect to their embedded device, transfer the firmware binary, over Bluetooth Low Energy to the embedded system.
Table Of Contents
Introduction
In microcontroller programming, a frequent task is flashing firmware to a chosen device. During development this is simple; the programmer can plug the device into their computer and flash the desired programme they want when they need to. They do not have to worry significantly about wear to the port caused by doing this, as they will either be: careful with the device to avoid damage; or knowledgeable enough about the system to be able to replace the device.
However, once the device leaves the programmers control and is released as a product, firmware updates can be problematic for several reasons, which differ on application, but usually revolve around access to the port, or trust of the end user. A simple solution would be to never update, but that is hardly feasible with current development methods of continuous development and delivery.
Many such devices also now use an ESP32 microcontroller, due to their low cost. One of their main advertised features is their wireless capability, and so I realised I could leverage this in order to remove the issues caused by continuous use as detailed above.
In this project, I developed my skills in embedded and mobile programming, to create a toolchain which solves this problem. It uses the Bluetooth Low Energy (BLE) capabilities of the ESP32 and a modern mobile phone, to allow the wireless transfer of firmware between a user’s phone and their embedded device, which is then installed on that device.
As I want this project to be used outside of by others, I have created it in four different sections: an Embedded Library, a NPM Library, Testing Firmware, and a Testing app. The libraries are the main code of the project, while the testing app and firmware serve as an example of how the libraries could be used.
Research
Before starting on this project, there were several aspects I was unsure how easy it would be to implement, which needed some research: how to compile an app, how to create a library which would work with the app, and how to communicate files over Bluetooth.
App
For creating and compiling the app, I found a toolchain called Ionic Capacitor. This allows me to create what is in practice a website using a web design library, in this case Vue.js, with the component library, provided by Ionic, and compile it into an app executable using Capacitor. Capacitor uses a system called WebView, which is a neat way to run a website offline inside of a mobile app.
Another alternative I also found in my research is a toolchain developed by Apache called Cordova. This is the basis of Capacitor, but the project itself has been around longer and so does not support more recent web technologies, like Vue.js, without a lot more setup. And as Capacitor is built on Cordova, I was able to use libraries which are also for Cordova (which is where the Bluetooth library is from).
Web Library
For creating the web library, this process required less research, as it is a more widely used process. I used Node Package Manager (NPM) for the publishing, as it is a tool I am already familiar with. This also made it easy to add any other packages I required from the NPM repository to develop the library, which I did need to.
Later in the project, I also found myself needing to process XML data. In typical JavaScript, this can be achieved through a built-in tool DOMParser(), but because my library would not be used in a web browser this was not available. Instead, I used a library called parse-xml, which turn the XML data into an object which is easier to search through.
Firmware
I did not end up doing much research into how the firmware aspect of this project worked, as I am already familiar with Bluetooth programming for the ESP32 using Arduino C++. But I did have a look for how other projects which implement OTA were able to flash the firmware. From this, I was able to find the built-in library Update.h which provides a set of functions which abstract the process to a set of begin, write, and end commands.
Design
Architecture
When this toolchain is used as I expect it to be, there will be three parts to the update process:
- The release server, which stores the firmware binaries on a web server. It has an archive to provide some information about each release, and a known location for where the file is. I tested this with Gitea and GitHub, as I assume that any programmer using this project would track their code using one of these git hosing solutions, or something similar.
- The mobile app, which provides an interface for the end user. It accesses the archive using the web library and is able to send the firmware update to the embedded system via Bluetooth.
- An embedded system, which receives the update, and will install the new firmware.
App
In developing a testing app, I thought I would implement an example flow, which I would expect for when these libraries are used in other projects. It has a set of “pages” which are displayed through cards.
There is a card for each part of the app:
- Scan page allows for connections to the chosen device, every page but flash can go back here by disconnecting.
- Home page allows for movement to all other pages and shows an update button to alert the user to an update, if there is one available.
- Details page shows the blurb provided by a release to the user.
- Archive page shows all previous versions.
- Flash page allows the user to confirm that they want to flash the device.
- Flashing page shows the progress of the update and prevents any other activity while it happens.
- Settings page allows the user to change the software source, and whether pre-release versions can be installed.
Below is an image of my initial sketches of how they would look.
And here is how they ended up looking:


Release Archive
For the remote release archive, there were two main features I wanted, which are provided by frontends for git:
- Data store → git services have a “Release” section on their repositories where the programmer(s) can post a snapshot of their code as a “release”, along with a short blurb. This is automatically published as an ATOM or RSS feed, which has a standardised format.
- Retrieving the releases → git services have a space for the developer to upload files alongside the release, as well as the code at the time of release.
The updater library is then able to download the RSS feed and the files in the releases, to provide the user information about the update, and to update the firmware.
File Number Monitoring
To decide when the firmware on any device, I needed two sources of version numbers: the archive, and the firmware. From the archive this is simple, as I can use the version’s title as a version number. For the firmware, I have to create a Bluetooth endpoint which the app can monitor. If the version number reported by the firmware is not the latest version in the archive, then it will report that there is an update to the app.
File Transfer
This section of the project was the largest part of the project, and what allows it to function as a system, in a way I wanted it to. It allows the frontend library to download the firmware version from the archive, then turn it into packets, and transfer the packets, in order over Bluetooth. The firmware library will then receive the packets and re-assemble them into the firmware binary, which it will load on the next reboot.
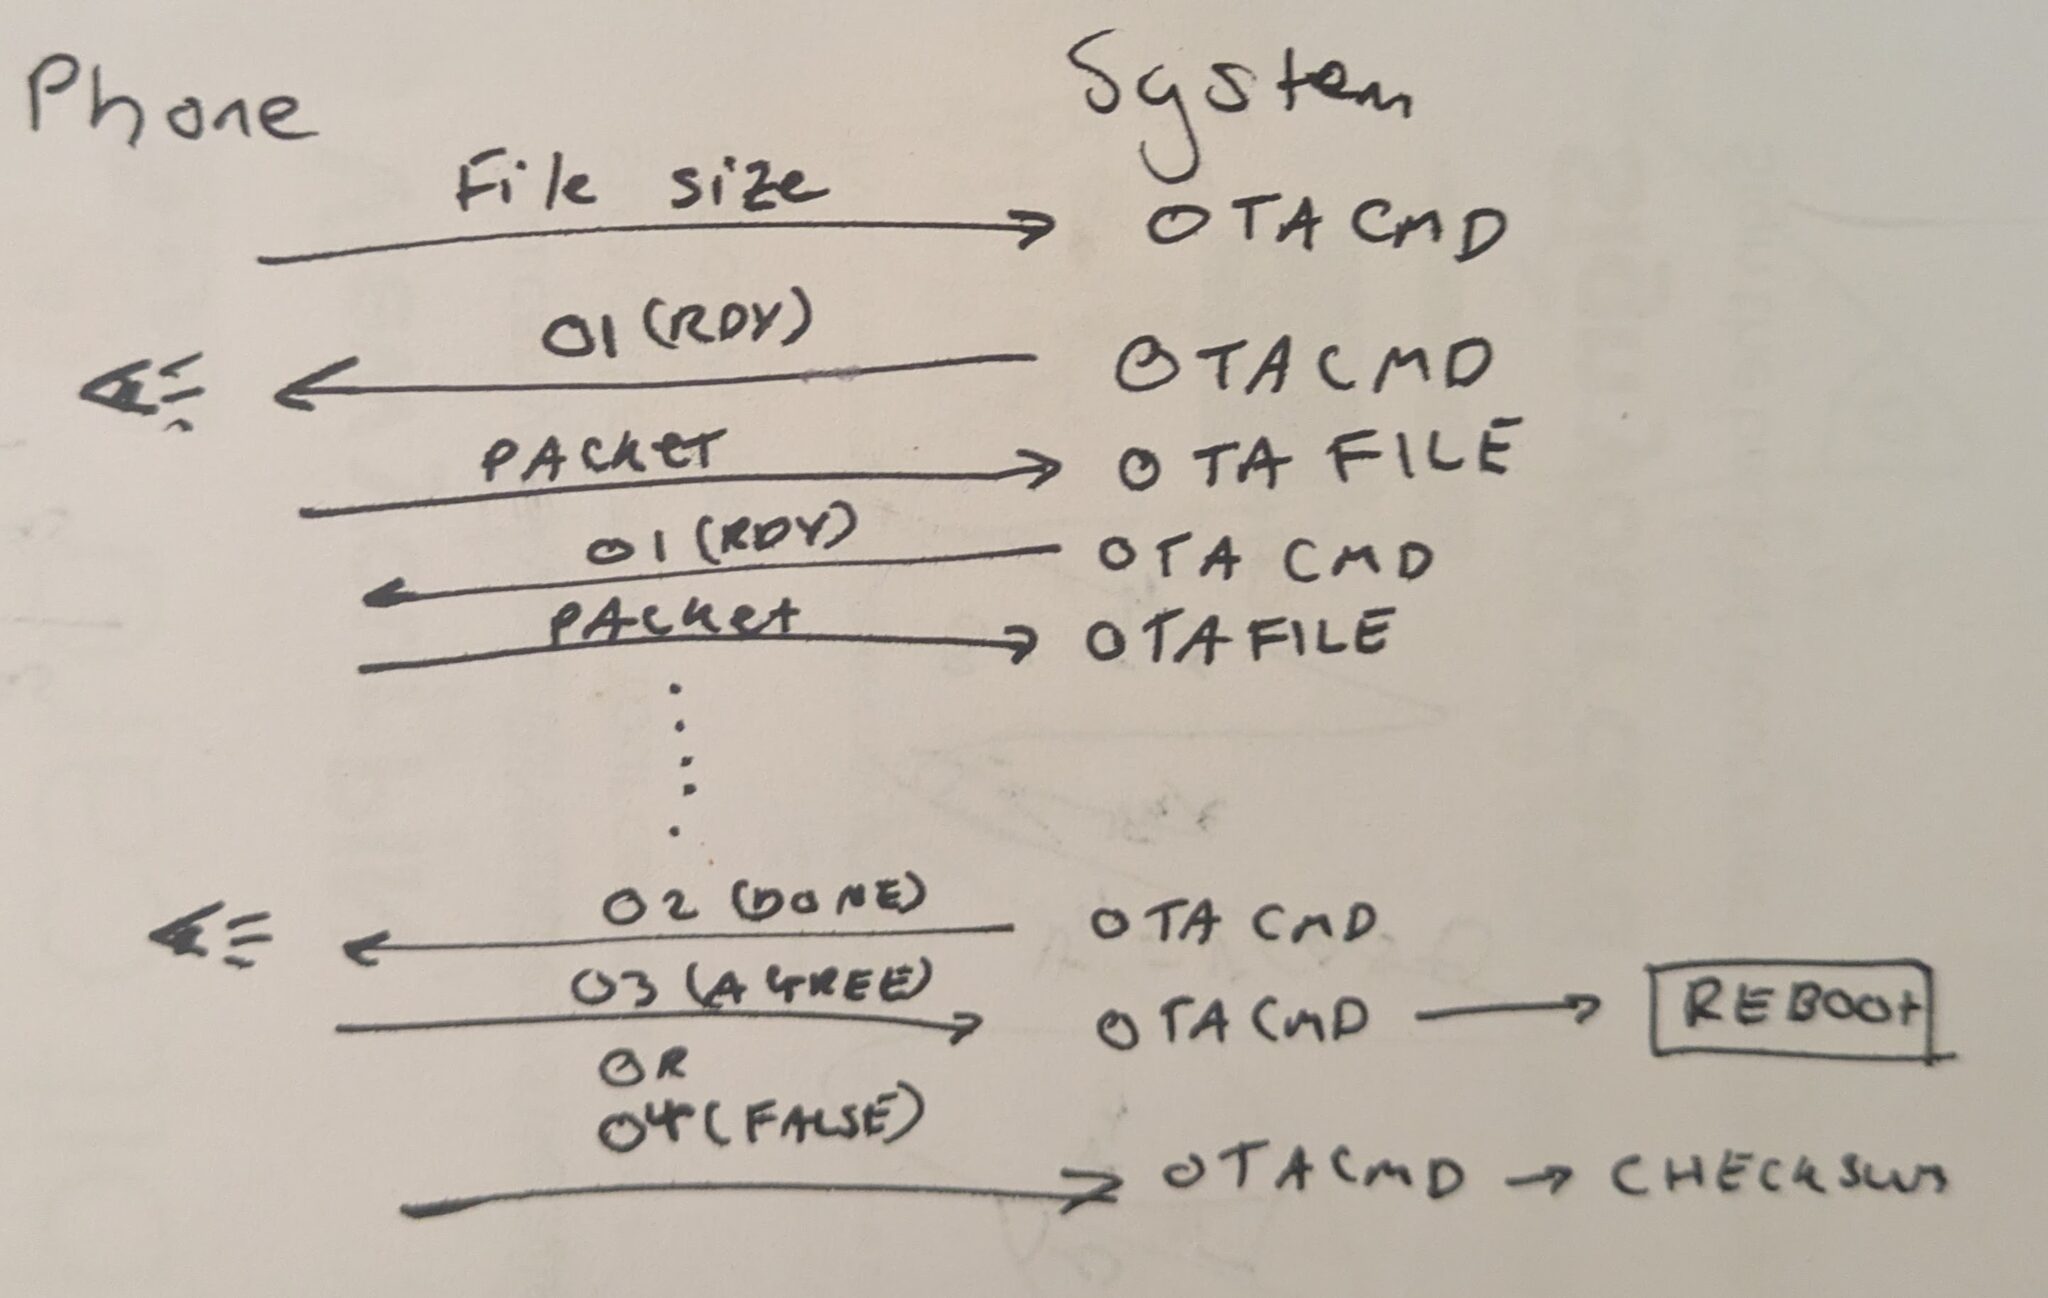
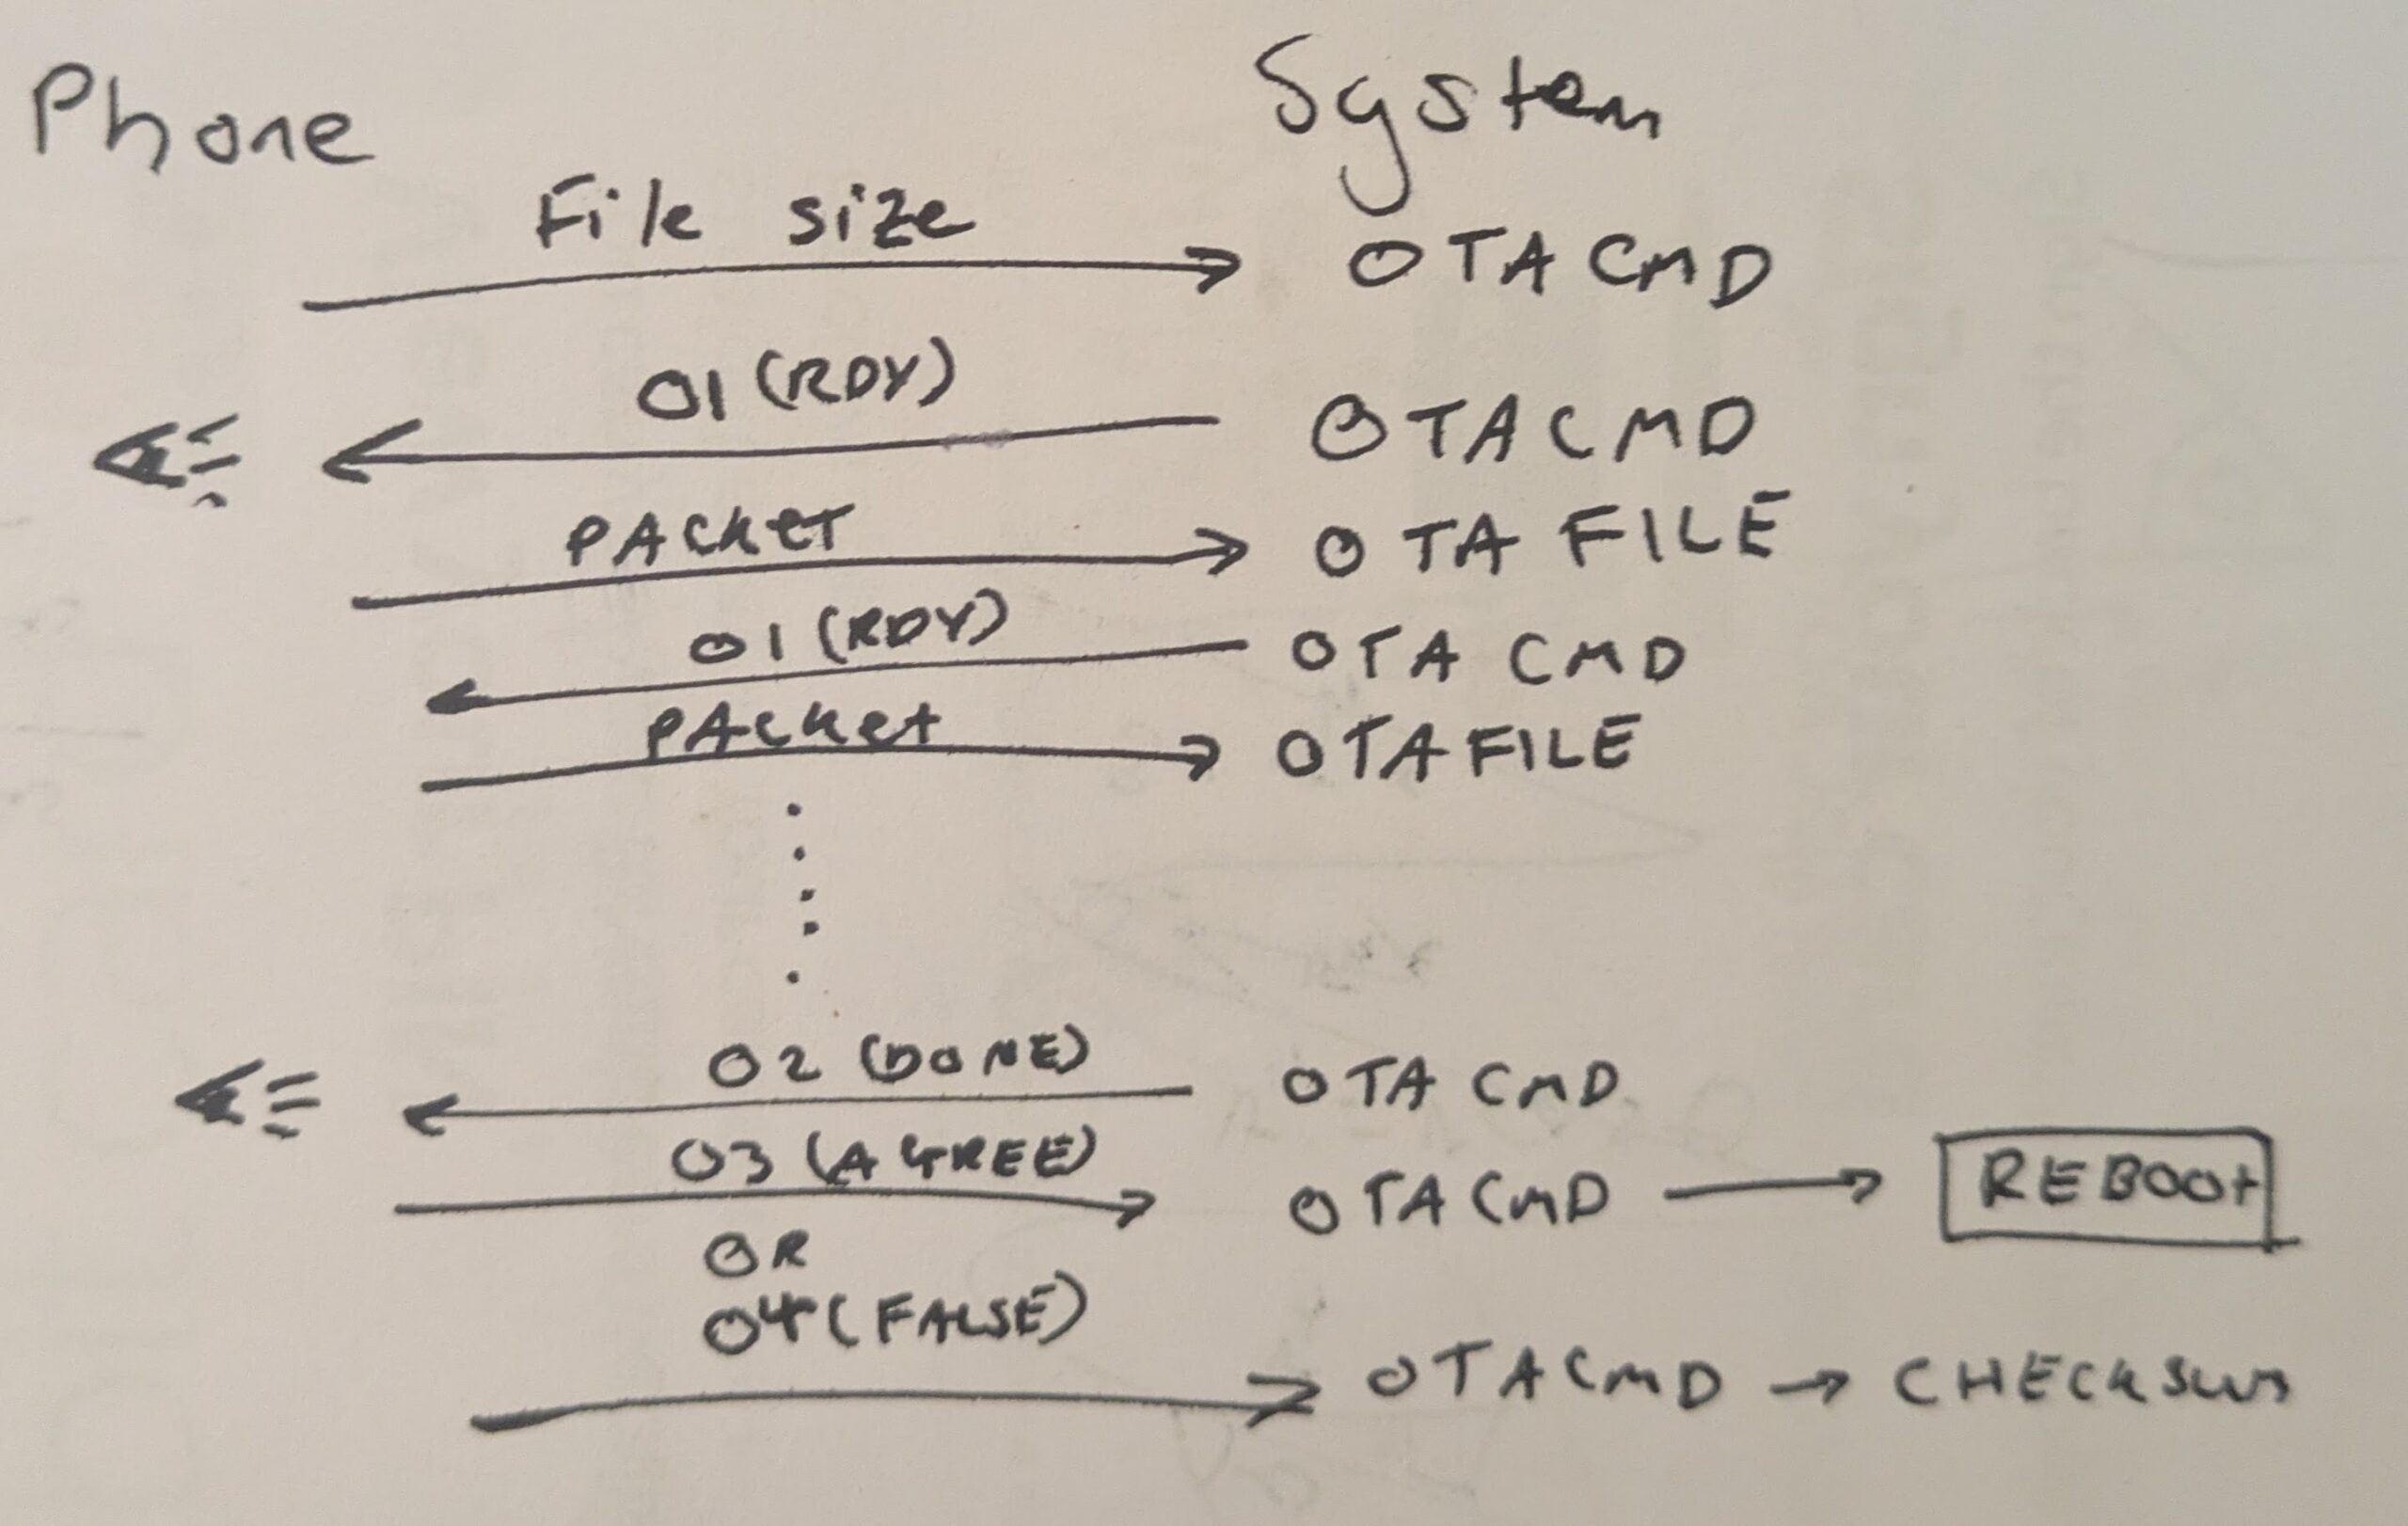
For the transfer of the packets, I devised a communication “protocol” which sits on top of Bluetooth, allowing me to send the files relatively quickly. As an overview of how it works, there are 3 stages:
- The frontend initiates the upload. The phone will send a packet to the microcontroller telling it the file size being received, and the microcontroller will prepare for the update.
- The file transfers. When ready, the firmware will send a ready command to the phone, asking for a packet. When this is received, a packet is sent. This then repeats until the end of the file. Both parties keep a track of file progress and file size as the transfer happens.
- The file transfer has finished. If the protocol has worked correctly, the firmware will send a “DONE” command to the phone when the file progress equals the file size. If the phone agrees, it will send a “AGREE” command, and the process has finished. However, if the phone finished sending packets early, the firmware sends an error command as it does not think the file transfer has finished yet. If the firmware sends the “DONE” command too early, the phone will send back a “DISAGREE” command, the firmware will reach an error state, as it does not know where the problem occurred.
While this is not the most efficient, it has proven to be the easiest to implement and has some basic error checking which prevents any incomplete file transfers.
Implementation
Stages
For my implementation, I worked in stages so that I could do different sections at a time, for what I thought would be the most logical chunks of work at the time. These were:
- Programme the app interface, so that I could work out how to compile the app.
- Monitor the version archive from the app, to test that I could use a Git interface as an archive.
- Monitor the version numbers, to ensure the Bluetooth stack was working from both sides of the communication.
- Transfer and install the update, this uses all the tools I have used in previous steps.
Programme the app interface
For this stage, I converted the drawings I had made into a User Interface (UI) using Vue.js and Ionic. Since at this point, I was not using any mobile specific code, I could test this as a website and make every aspect, before I compiled the app.
The interface’s “pages” or cards are traversed using buttons for the user, but behind the scenes there is a state machine which stores a counter for where the user currently is. The count has a history of one for going back, any further backwards movement goes to home, as that is the furthest away from any one point in the navigation.
Monitor the version archive from the app
Data store
Since all my code was stored on a Gitea instance, I created two releases in the firmware repository for testing the archive functionality, both are blank but have different version numbers and blurbs.
Web Library
I began to separate the logic into a library for this section, as it is part of the tool set which I want to be able to use elsewhere when the project is finished. Within the library, there is a class called Updater which stores the methods for processing the archive data and will later hold the data for file transfer.
I started with retrieving the RSS or ATOM feeds. The URL and type of the feed is set in the constructor when the object is initialised. There is then a method to retrieve the file as a “blob object” which uses a simple fetch() request.
I then handled this data using an XML parser. Originally the JavaScript built-in parser but this does not work for a package so switched to a library called @rgrove/parse-xml which provides a simple interface to interact with RSS and ATOM feeds.
These feeds are in a file format called XML which follows a tag system similar to HTML. For RSS feeds there are standard tags for a post and its contents, so to retrieve the data from the RSS feed the library only has to look for a specific set of tags. I chose to look for:
- Title – which I am choosing to format as a version number but can be anything.
- Date – to show when a given release was published.
- Link – a link to the release if the user wants to go back to the source.
- Content – the RSS feed provides a HTML content which can be used for the blurb.
I then convert these parts into an array of objects using a data structure I have named versionNotes and is as follows:
type versionNotes = {
     title: string;
     date: Date | string;
     link: string;
     html: string;
}
The reason for the date property being Date | string is because RSS and ATOM feeds provide their dates differently. From ATOM feeds, the date can be processed by JavaScript; but it cannot from RSS feeds.
I have split this functionality across several methods, but only one is public. Based on the values provided in the constructor, the object is able to select which methods are run. There are duplicate methods depending on whether RSS or ATOM feeds are used, since the tag names are different across the standards.
Having made the code for the library, I was then able to publish and access the code from the app using the NPM package repository, which provides version management and easy code sharing for the library (like how this project functions).
Example app
Once I installed the library using NPM, I was then able to add the library’s functionality to the app.
By design, Vue.js splits each page of the app into different sections which makes the code easier to manage, but provides issues which moving data, such as the instance of the library’s Updater object around the app. One of the solutions to this is to use a “store” this creates a static object which, when instantiated, still looks to the same part of memory to access different variables.
So, for accessing the archive of data, I have an archive store which holds the Updater object, and a copy of the archive array. This allows me to set the archive URL from the settings page and then view the archive list from the archive page.
The archive list shows the title, and date field of each versionNotes object in the archive array. These can then be clicked, to go to the details page, which shows every part of the versionNotes object for the specific release.
Bugs
When creating the library, the most significant issue was Cross Origin Resource Sharing (CORS), which is supposed to ensure the security of data being transferred between different websites by an API for example. But here the endpoint to retrieve the RSS feed did not have the required headers in the request for the web browser, and by extension the app’s WebView, to accept the request. This is not an issue for most RSS readers, as they are offline, and so are not cross origin.
My solution to this issue is to use an open-source CORS proxy. This small piece of software serves a small web API which can be requested to the endpoint /?url= with the URL trying to be accessed. It will then complete the request, and inject the correct headers into the response, to avoid the issues caused by the browser’s security.
Monitor the version numbers
BLEOTA Library
As advertising the version number is another section of code I want to share between projects, I added this to a library. This takes the form of a class definition BLEOTAClass and a predefined instance BLEota which can function as a global object, which can be helpful depending on how the programmer has arranged their project. For this section, only one public method is required begin().
This procedure takes two parameters BLEServer* server and char* versionNumber. server is a pointer to the BLE server object, which allows the library to use the same BLE instance as the firmware it is used with. Within the procedure, a service called otaService is created with one characteristic _pVersionNumber which stores the version number provided by versionNumber. Version number is a string rather than a double or integer as for a standard version number, there are two decimal points, and there is no set point where each number changes. It is also because the release feed processor relies on the release title to hold the release number, so if the developer chooses to place a more descriptive title here, it will be used as the version number instead.
The class also has a constructor which is implicitly called, which will create the objects needed for the BLE characteristics.
Embedded Example
For the software release, a useful example I have decided to use is the blink program. This is a simple program which uses a development board’s integrated LED to flash (or blink) at a set time interval. I thought this would be a good demonstrator as I can have multiple versions with a different flash period, to prove the updates are working.
In the firmware, the user also needs to define the way in which the BLE server will run, handling advertising and some boilerplate call-backs. It then runs the begin() method, defining the version number as 1.0.0.
I have then created two releases from this to have an example “update”. One is just the blink program on its own. The other also includes the BLE code.
Web Library
To make version monitoring work, I added several different parts to the library.
To allow the library to communicate with the embedded system, I added a new parameter to the constructor called bleObject. Since the BLE library exposes an object rather than a class definition, I cannot be sure that the object used by the library is the same as the object used by the application. So, to bleObject the programmer will pass the default ble object, to ensure both sections are using the same ble.
As it is sharing different parts of the BLE protocol between the modules, I added a procedure setDeviceId(). This takes one parameter, a string, which defines the variable bleDeviceId to allow the library to talk to the Bluetooth device.
The next public function I added was checkForUpdate(). This has no parameters, and returns a boolean, for if there is an update or not. The method will read the versionNumber characteristic on the Bluetooth device, read find the latest release’s version number, then compare the two. If they are not the same, function will return true; this does not take into account the active firmware being a pre-release, but that should not be an issue.
The last public function I defined was getBoardVersion(). This also has no parameters and will return a string which contains the value stored on the versionNumber characteristic.
Example App
For communicating with the embedded hardware using BLE, I needed to use a library. As the code I am writing is being compiled from a website to an app, I cannot use base webBLE which would be used if it was a browser only piece of software. Instead, I am using a library which has both aspects of the code, so I could program it with JavaScript, and it could be compiled into an app.
The first section I built with this was the Scan page. This searches for any surrounding BLE devices and allows the user to connect to a specific device for communication. Using the library this is relatively simple and only requires two functions.
For scanning, the function ble.scan() is used. This takes several arguments, however the one which I needed in particular is the success call-back function. This is called when the function finds a device, so that rather than returning once, it can return repeatedly over a set period. In the success procedure, the latest device info will be added to an array of devices, which is then presented to the user as a list. The user can then click on a list item to connect to a device. Then on every other page, except flash, the user can disconnect from the device and return to the scan page.
The next section I changed was the home page. The update button was always visible and would go to the latest version. Now, using checkForUpdate() in the library I can view if the connected device needs an update. If true, then the button will be shown, with a link to the latest version. If not, the update button will not be visible, but the updates are still visible through the archive page.
On all pages, I had also made it so that the user could view the current version firmware before this had just a place holder “v1.0.0”. Now, using getBoardVersion() in the library, it displays the current firmware version. This function is also used on the flashing page, where it says the current firmware version, and the firmware which the system will be updated to.
Transfer and install the update
Firmware Library
To implement file transfer for the firmware, I needed two things, a way to receive the packets, and a way to flash the new firmware to the flash. The former is what I developed, but for the latter, I was able to use a built-in aspect of the esp32-arduino SDK Updater.h. This library holds several functions which make the flash process as simple as Update.begin(), Update.write(), and Update.end(); but the use of these methods has little to no documentation so I’ll explain aspects of it as I write.
For the transfer protocol described above, I needed two new BLE characteristics, one for the command, and one for the actual data. The command characteristic is a WRITE/NOTIFY characteristic so that a command can be written to the device, and it can send commands back to the frontend. The data characteristic is a WRITE characteristic, so that it can receive the file packets.
For the command characteristics, there are two different types of data I expect to be receiving. At the start I will receive a full size unsigned int to hold the file size; but the rest of the time, I should only be receiving an unsigned char , as it is simpler to hold the commands in a one byte hex number (although this did need to change later on). So I implemented a simple state machine to track whether it should be receiving an unsigned int. This has 4 states: READY, FLASHING, DONE, and ERROR. The board can only receive the unsigned int during the READY state, at any other point this will move the firmware into the ERROR state.
An important part of a transfer protocol is the speed (something I found out the hard way), so to respond to each part of the protocol quickly I used call-backs, which are triggered when an event happens for each characteristic, such as a write. Since both new characteristics handle write events, they both have a set of call-backs.
When the command characteristic is written to the call-back onWrite() will branch based on the length of the received command.
- If it is 4, and the state is READY it will be processed as the file size and stored to a property of BLEOTAClass called filesize_. This will also change the state to FLASHING, and run Update.begin(). This takes two arguments which tell it how large the file is, and whether it is the firmware, or SPIFFS (SPI Flash File System).
- If it is 1, the firmware will be expecting an AGREE or DISAGREE command. For an AGREE, it will run Update.end() preventing any further writing to the flash. The state will change to DONE, and the firmware will reboot the next time loop() is called (see below). For a DISAGREE, the state will change to ERROR, as there has been a progress counter issue.
- If it is anything else, the firmware will go to an ERROR state, as it does not know how to process this.
When the data characteristic is written to a call-back by the same name onWrite() is run, which also branches based on the length of data received.
- If it is 0, the firmware will go to an ERROR state, as an empty packet will mean that an issue has occurred in the transfer process.
- Otherwise, the firmware will write the received packet to the flash using Update.write() which takes a pointer to the data, and its length. It returns how much data is written so could also cause the ERROR state to be triggered if the updater library does not write as much data as it is asked to. If the written size is correct, the firmware will increment the file progress, based on the data length.
From within this function, the firmware also counts the file progress and decides whether or not the file transfer is finished. If the file progress is the same as the file size, it will send a DONE command to the remote device starting the finish section of the transfer protocol.
I also added a method to the BLEOTAClass called loop(). This takes no arguments and at a fixed interval, will check the state. If it is ERROR, the command ERROR will be notified to the command characteristic. If it is DONE, then the firmware will reboot the microcontroller.
Bugs
When writing this aspect I found that the value of the file progress counter for the frontend would go out of sync with the firmware due to a difference in how much data was sent, vs how much was received. Since I was already checking the size of the packet, it was easier to tell the frontend where it should be, rather than trying to find the lost bytes (which do not seem to be a problem with this bug fix). To implement this I modified the protocol slightly.
When a packet is received and written to flash, rather than saying READY to the command, it will send the new file progress as the command, which the frontend will override as the counter. When implemented, the file transfer may be slightly slower, but reliably transfers the entire file binary.
Frontend Library
For downloading the firmware binary I created two methods, getFirmware() and getFileSize(). The first runs a fetch statement to the downloads section of the version archive, and stores the resulting bytes into a private property of the Updater class called file which is an Int8Array. It then returns true if there are no errors, or false if something went wrong. getFileSize() then returns the number of bytes in the file property.
Then for the file transfer I have a public method for the main program to run which initiates and handles the entire file transfer process, flashFirmware(), along with several private helper functions, and properties. flashFirmware() takes one argument progressCallback, which is a function which can be called to provide some feedback to the program using the library, and returns a boolean Promise, so the program can do other tasks while this subroutine runs. It starts by setting the Minimum Transmission Unit (MTU), which is the packet size used by Bluetooth. It will attempt to set it to a packet size defined by the user in the constructor, _packetSize but this can change if the MTU is not agreed upon by the Bluetooth device.
It will next start a notification to the command Characteristic, or in other words, start waiting for the firmware to send a command response. If a command is notified, then it will run a provided call-back to handle the file transfer protocol I have defined, which I will return to in a minute. If starting the notification fails, the method will reject the Promise and provide some feedback on why it could not start the file transfer. But if it does succeed then send the file size to the command Characteristic, initiating the file transfer.
When there is a response from the remote system, then the file transfer call-back is called. This takes one argument rawData which holds an ArrayBuffer of the data received over Bluetooth. The call-back then branches based on the size, and value of the command received:
- If the value and length is one, then it will be a READY command, and will send the first packet.
- If the value is two and the length is one, then it will be a FINISH command. Here it determines whether or not it agrees the transfer process has finished, and will then respond with either the AGREE or DISAGREE command. In the case that it does agree, the notification will be closed, and the Promise will resolve to true.
- If the value is 15 and the length is one, then it will be and ERROR command. Since this is not descriptive to the method what the error is, it will reject the Promise with an error, and provide some feedback through progressCallback.
- Otherwise, it assumes that it has received a file size, and so will update the progress property _fileProgress, and send the next packet.
Whenever a packet is sent containing, the progressCallback, will be provided with some data about the write progress.
The other helper methods are sendEndCmd(), which handles sending AGREE or DISAGREE, and sendNextPacket(), which sends a packet of size specified by _packetSize.
Bugs
As mentioned before, there were some issues with data loss in transfer, which I remedied through having the embedded system track the file transfer progress. For the frontend library aspect, I only needed to add the final branch of the notify call-back, to track the file progress; everything else stayed the same.
Example App
For the app, using the frontend library was relatively simple. I added the buttons to allow for the file flashing to be triggered, which prevents the user from doing anything else in the app, and displays a warning not to turn off either device. And I also have the file progress call-back, which displays the progress call-back to the screen in a textbox, as a progress display, so the user can see that something is happening.
Toolchain
This is just a brief summary of all the tools I used for the project, and what they were for.
App
- Vue.js – a way to split web apps across several files, and simplify the process of adding iterative sections of code, at runtime.
- Ionic – a set of components which look the same across all testing methods.
- Capacitor – a build tool to generate a mobile application from web apps
- Android Studio – run an Android emulator on my PC to reduce the number of builds to my phone
Web Library
- Vitest – unit testing library
- NPM – the tool for sharing and building JavaScript libraries
- Rollup – a tool to build the library into an easier to interface format for NPM
Firmware
- Platformio – a toolset which simplifies the compilation and development of firmware and libraries for embedded systems.
Testing
Archive Retrieval
For the early parts of the web library, I could test the code before I implemented it in the app using unit tests. For this I used a tool called “Vitest”. This allowed me to write a set of tests to programmatically validate different aspects of the library. Through this I wrote in several tests for the retrieval of the archives from different sources.
Through this I discovered the issues mentioned before relating to CORS, and was able to fix them without several publishes to the NPM package repository trying different bug fixes with the app.
Once this was working as expected, I published it, and installed it to the app, where I could test it’s functionality within the interface.
File transfer
Through testing I discovered several things which changed how the transfer protocol functioned, but for the way in which I did it: I had a few different software versions on the archive which blink the onboard LED at a differing rate, which I was able to flash between the versions to see that the transfer protocol worked. I also had a small version which only had the blink script, without any of the Bluetooth to shrink the file size.
In testing I had varying file transfer speeds. On my initial attempt, the file transfer was at a rate of ~128 bytes per second, which was a fault of the Bluetooth abstraction I used in the frontend library. To write data it has two functions, write() and writeWithoutResponse(). Initially, I was using write(), which would seem to be the best to use as it ensures that the data reaches the remote before continuing the program through a response packet. However, this was detrimental to the transfer speed, as I am already sending a response command when it is ready for the next file packet, so using writeWithoutResponse() was the correct function to use. When I moved to using this function, my transfer speed went up to an acceptable rate of ~10 kilobytes per second.
This section of testing was all done manually, as I could not use a testing library for the inputs to the app or the frontend library as I could not find a way to simulate the Bluetooth endpoints.
Evaluation
The actual submission sheet for this has some evaluation questions, so I will put a copy of my answers here:
What are you submitting as your Scholarship project? (Please explain what it is and how it works)
My project was a continuous delivery toolchain which allows for developers to publish their code to a GitHub repository. From there, an end user will be able to see that there is an update available and, when they connect to their embedded device, transfer the firmware binary, over Bluetooth Low Energy to the embedded system.
How long have you spent on your scholarship project?
I have spent a few hours a week on this project since the task was set.
What are you most proud about with your Scholarship project? What have you learnt from it? What new knowledge have you gained? What new skills?
I am most proud of the transfer speeds I was able to achieve over Bluetooth with my manual file transfer protocol. I have learnt how to create mobile apps with Bluetooth using website technologies.
What would you differently next time?
If I were to develop an app again, I would try to find a way which I could more accurately test my project in a way which will do the same steps every time.
Appendix
If you read this far, thanks for reading! I did this as a practice for my computer science NEA next year, as can find long pieces of writing, like this, tricky. But if you found it at all interesting, or you just want to look at my code, you can find it here:
https://git.emaker.limited/MicrocontrollerCD
Sources
Here are some of the pages I looked at while developing this project for when I didn’t understand something, or which had a useful bit of information:
Leave a Reply